Segmentation
The Segmentation feature in LaraPush is a powerful tool that allows you to group your audience based on various criteria, enabling you to send targeted notifications to specific subsets of your user base. Here's a list of user properties, enabling you to segment your audience based on these specific criteria:
- URL: This refer to the specific page or set of pages on your website where a user subscribed to your notifications. For example, if a user subscribed while on a page about "gardening tips", you might segment them into a "gardening" group and send them notifications related to gardening.
Content Personalization: If you run a news website with various categories like sports, technology, health, etc., you can segment users based on the category pages they subscribed from. For instance, users who subscribed from a page in the sports category can be grouped into a "Sports" segment. You can then send them notifications about new sports articles, ensuring that they receive content relevant to their interests.
Country/State: This allows you to segment users based on their geographical location. This can be particularly useful for businesses that operate in multiple regions or countries and want to send location-specific notifications.
Device: This allows you to segment users based on the type of device they are using, such as a mobile device or a desktop computer. This can be useful for tailoring the format or content of your notifications to the device type.
OS: This refers to the operating system of the user's device, such as Android, iOS, Windows, or MacOS.
Browser: This allows you to segment users based on the web browser they are using, such as Chrome, Firefox, Safari, or Edge.
Date: This refer to the date a user subscribed to your notifications. For example, you might want to send different notifications to long-time subscribers versus new subscribers.
By segmenting your audience based on these criteria, you can ensure that the right notifications are being sent to the right users, which can lead to higher engagement and conversion rates
How to use conditions to choose criteria?
You can use the and condition in segmentation allows you to narrow down your target audience by combining multiple criteria. Each additional condition you add further refines the group of users you're targeting.
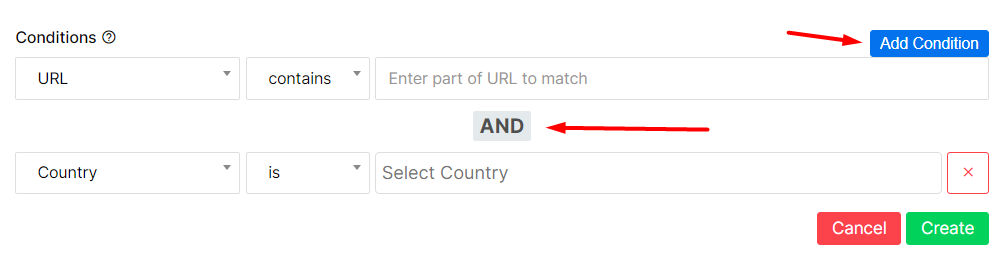
For example : let's say you run an e-commerce website and you want to target a very specific group of customers with a special offer. You could use the "AND" condition to create a segment of users who meet all of the following criteria:
- Subscribed from the "women's shoes" page (URL-based condition)
- Located in the United States (Country-based condition)
- Using a mobile device (Device-based condition) With the "AND" condition, a user would have to meet all three of these criteria to be included in the segment. This way, you can ensure that your notifications are being sent to a very specific, targeted group of users.
However, it's important to note that while the "AND" condition can help you target your notifications more precisely, using too many conditions can significantly reduce the size of your target segment. It's always a good idea to balance the level of specificity you need with the size of the audience you want to reach.
Preview Segment Size
Once you've defined your conditions, use estimate button to preview the size of the segment. This feature will give you an estimate of how many users currently meet all the conditions you've set.
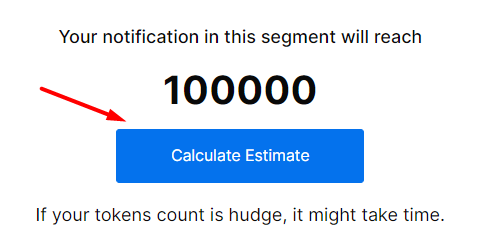
The process usually involves the tool scanning your user base according to the segmentation conditions you've defined, and then providing an estimate of the number of users that meet those conditions. This can help you understand the potential reach of your notifications for that segment.
If the estimated result is larger or smaller than you expected, you can adjust the segmentation conditions accordingly before saving. For example, if the segment is too small, you might want to broaden your conditions to include more users. Conversely, if the segment is too large, you might want to narrow down your conditions to target a more specific group.
You may have to finalize and store your segment before the system can calculate and display the estimated number of users it includes.
How to Create Segment?
Navigate to Segment and click on Create New Segment.
- Enter your segment name.
- Select domains (for multiple domains, click on Selective and choose your domains),
- Choose the properties and conditions
- Check the estimate.
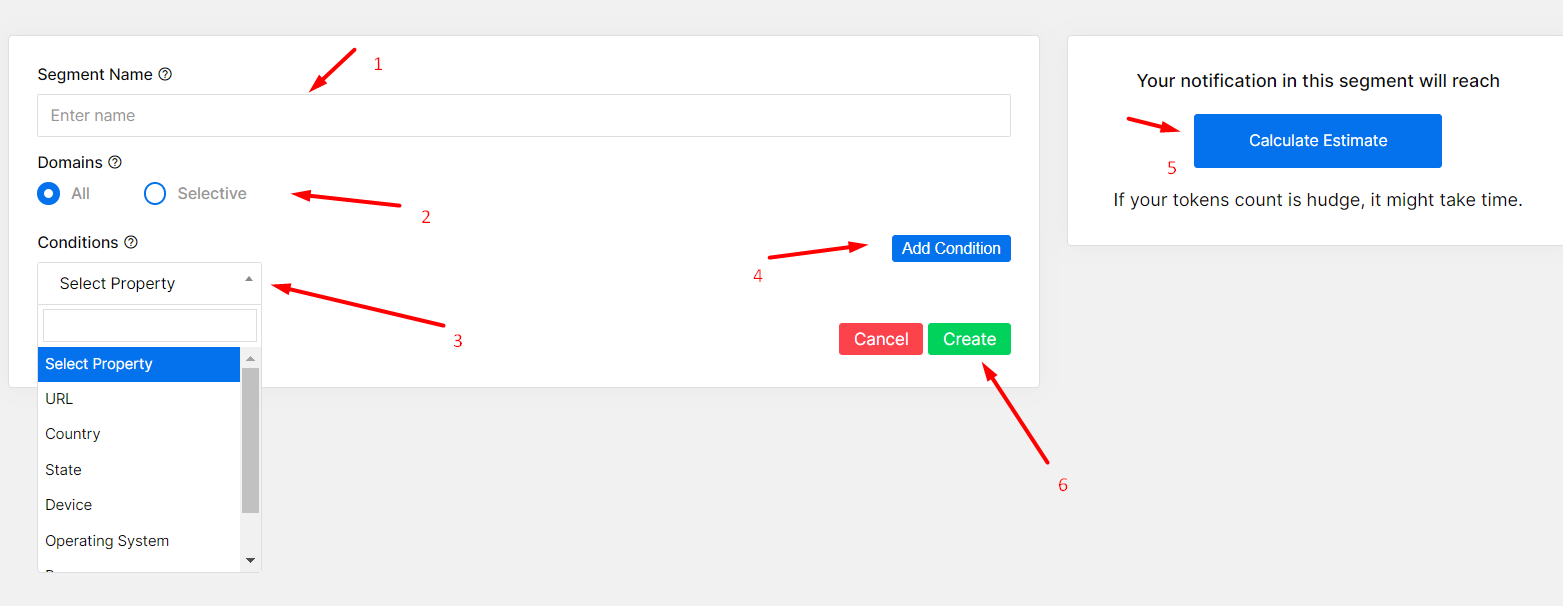
Once you're satisfied with the size and specificity of your segment, you can finalize and save your segmentation.
You can now use this segment directly in while Creating Campaigns